

/bin/zshQTM 350: Data Science Computing
Topic 02: Computational Literacy, Command Line, and Version Control
Professor: Davi Moreira
January 23, 2024
Topic Overview
Computational Literacy
- Binary and Hexadecimal numbers
- Characters, ASCII, Unicode
- High vrs low level programming languages
- Compiled vs interpreted languages
Command Line
- Shell basics
- Help!
- Navigating your system
- Managing your files
- Working with text files
- Redirects, pipes, and loops
- Scripting
Version Control
- Data Science Workflow
- Reproducibility
- Git and GitHub
Command Line
What is the command line? What is the shell?
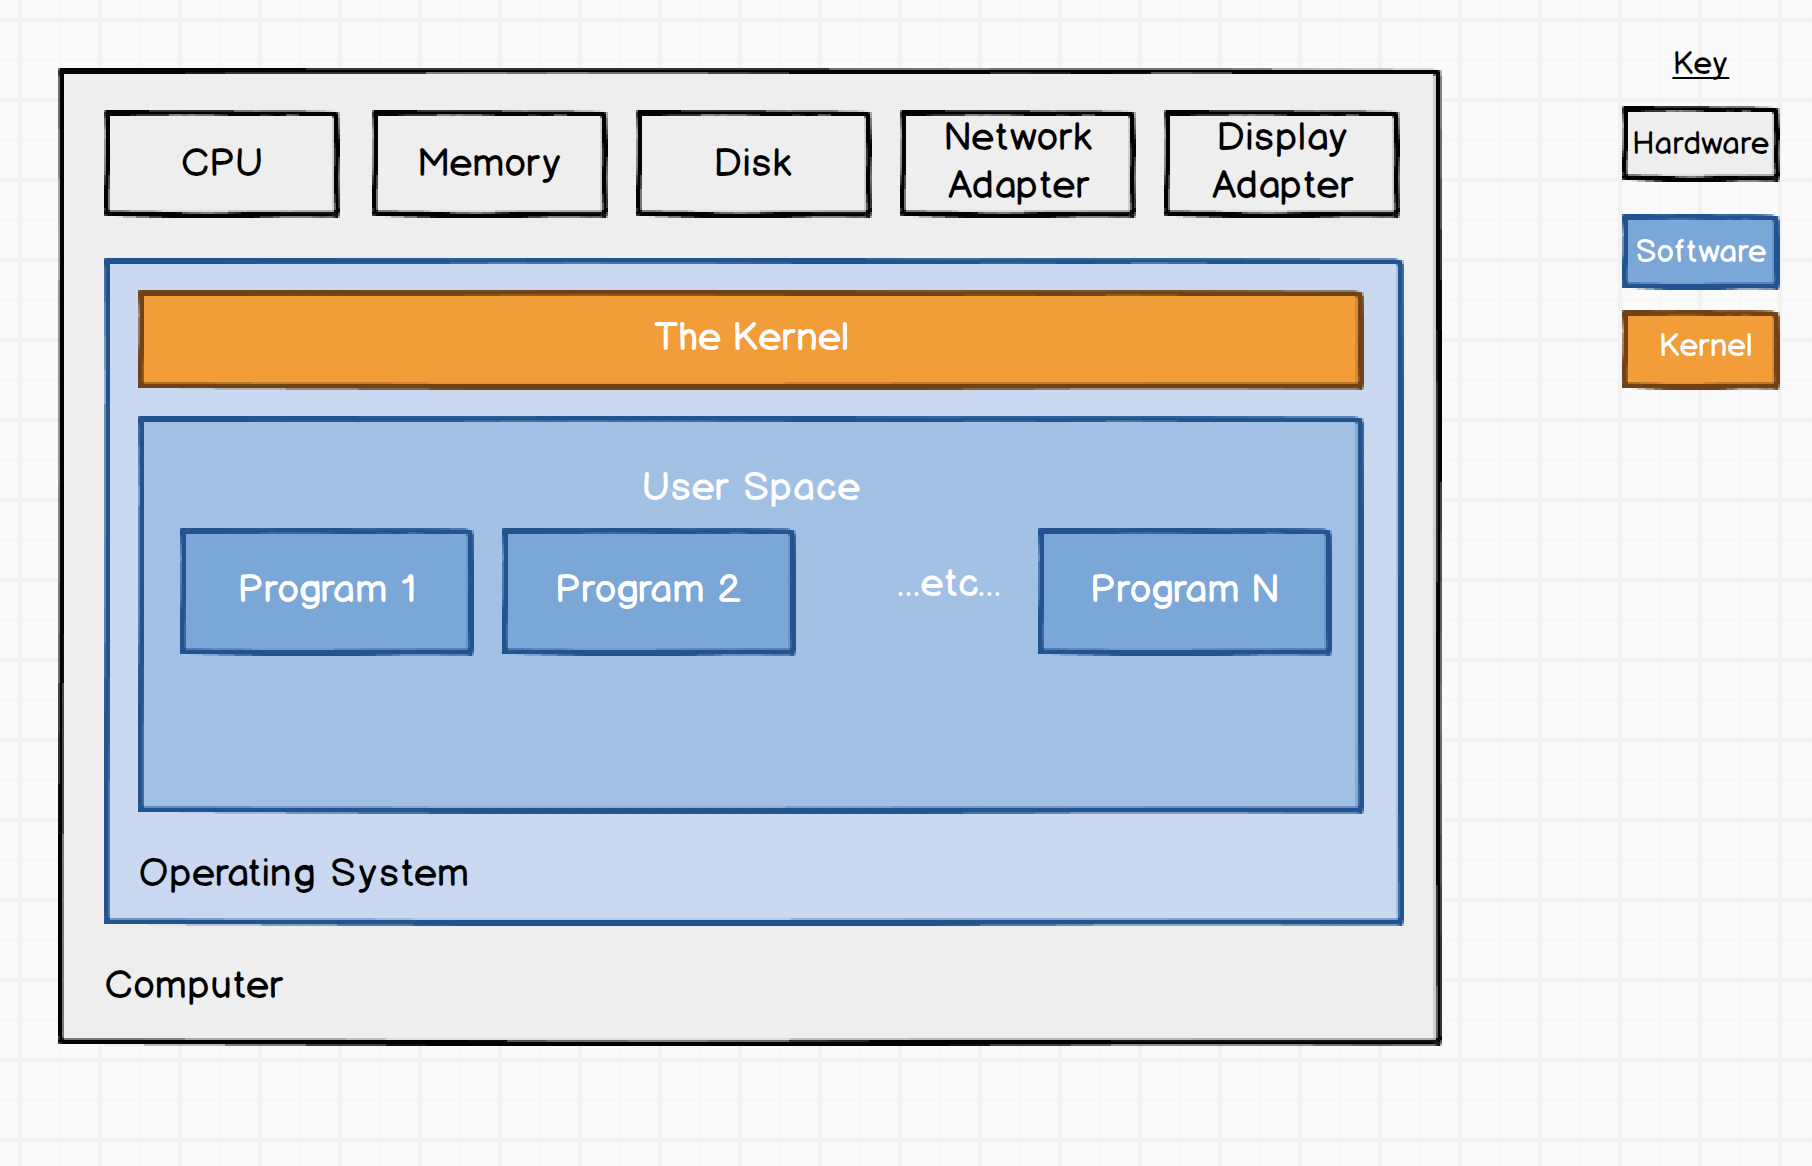
A computer in a nutshell
Credit Dave Kerr
- The operating system (OS) is system software that interfaces with (and manages access to) a computer’s hardware. It also provides software resources.
- The OS is divided into the kernel and user space.
- The kernel is the core of the OS. It’s responsible for interfacing with hardware (drivers), managing resources etc. Running software in the kernel is extremely sensitive! That’s why users are kept away from it.
- The user space provides an interface for users, who can run programs/applications on the machine. Hardware access of programs (e.g., memory usage) is managed by the kernel. Programs in user space are essentially in sandboxes, which sets a limit to how much damage they can do.
A computer in a nutshell
- The shell is just a general name for any user space program that allows access to resources in the system, via some kind of interface.
- Shells come in many different flavours but are generally provided to aid a human operator in accessing the system. This could be interactively, by typing at a terminal, or via scripts, which are files that contain a sequence of commands.
- Modern computers use graphical user interfaces (GUIs) as the standard tool for human-computer interaction.
- Why “kernel” and “shell”? The kernel is the soft, edible part of a nut or seed, which is surrounded by a shell to protect it. Useful metaphor, no?
Interacting with the shell
- Things are still a bit more complicated.
- We’re not directly interacting with the “shell” but using a terminal.
- A terminal is just a program that reads input from the keyboard, passes that input to another program, and displays the results on the screen.
- A shell program on its own does not do this - it requires a terminal as an interface.
- Why “terminal”? Back in the old days (even before computer screen existed), terminal machines (hardware!) were used to let humans interface with large machines (“mainframes”). Often many terminals were connected to a single machine.
- When you want to work with a computer in a data center (or remotely ~ cloud computing), you’ll still do pretty much the same.
Interacting with the shell
Credit Dave Kerr
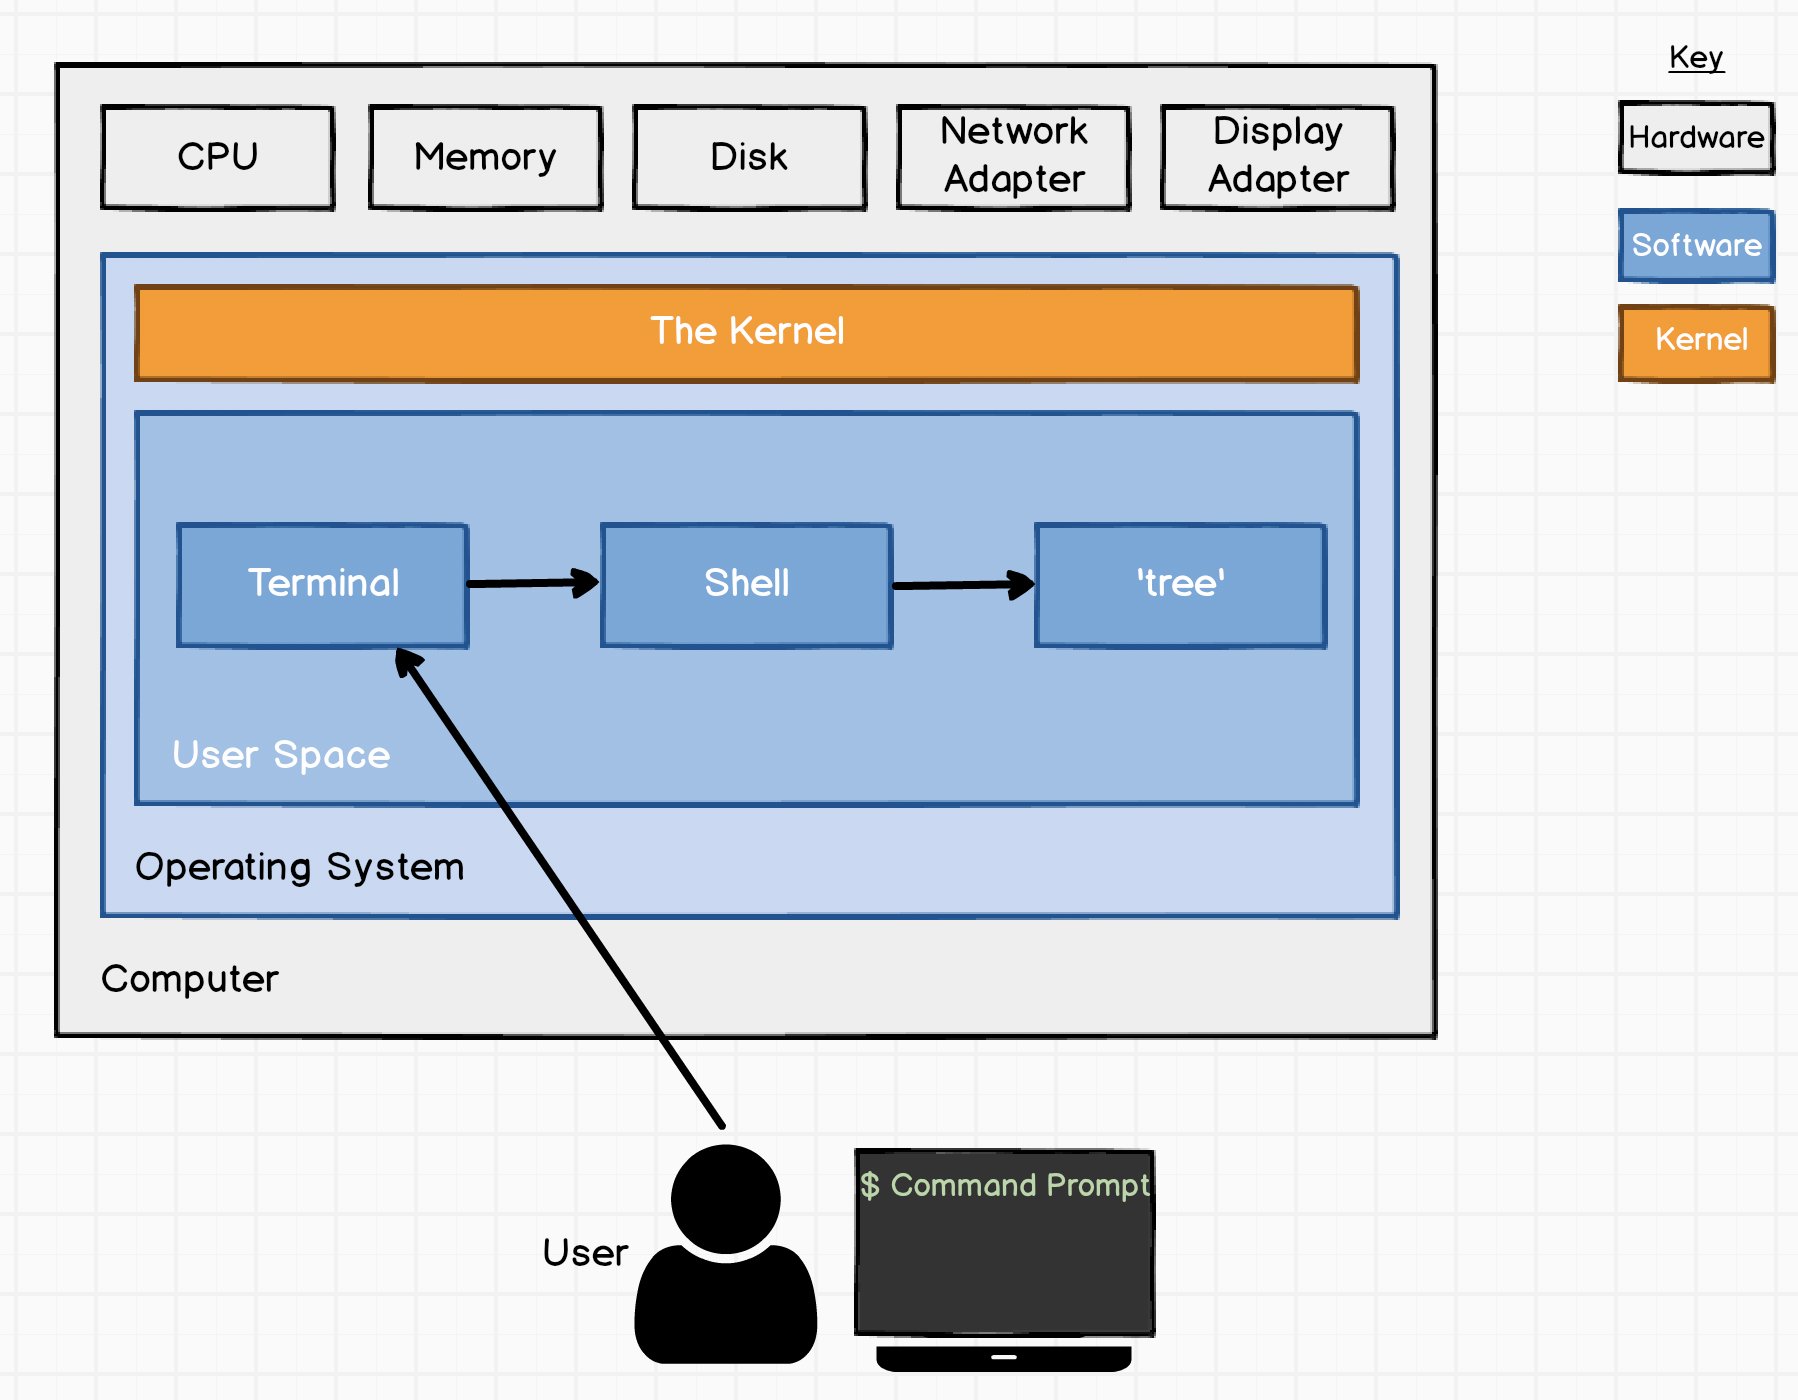
Terminals are really quite simple - they’re just interfaces.
The first thing that a terminal program will do is run a shell program - a program that we can use to operate the computer.
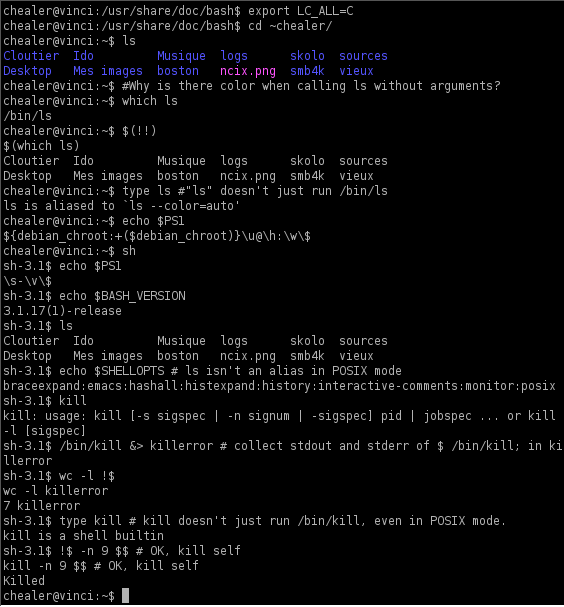
Back to the shell: the shell usually takes input
(a) interactively from the user via the terminal's **command line**.
(b) executes scripts (without command line).
In interactive mode the shell then returns output
(a) to the terminal where it is printed/shown.
(b) to files or other locations.
The command line (or command prompt) represents what is shown and entered in the terminal. They can be customized (e.g., with color highlighting) to make interaction more convenient.
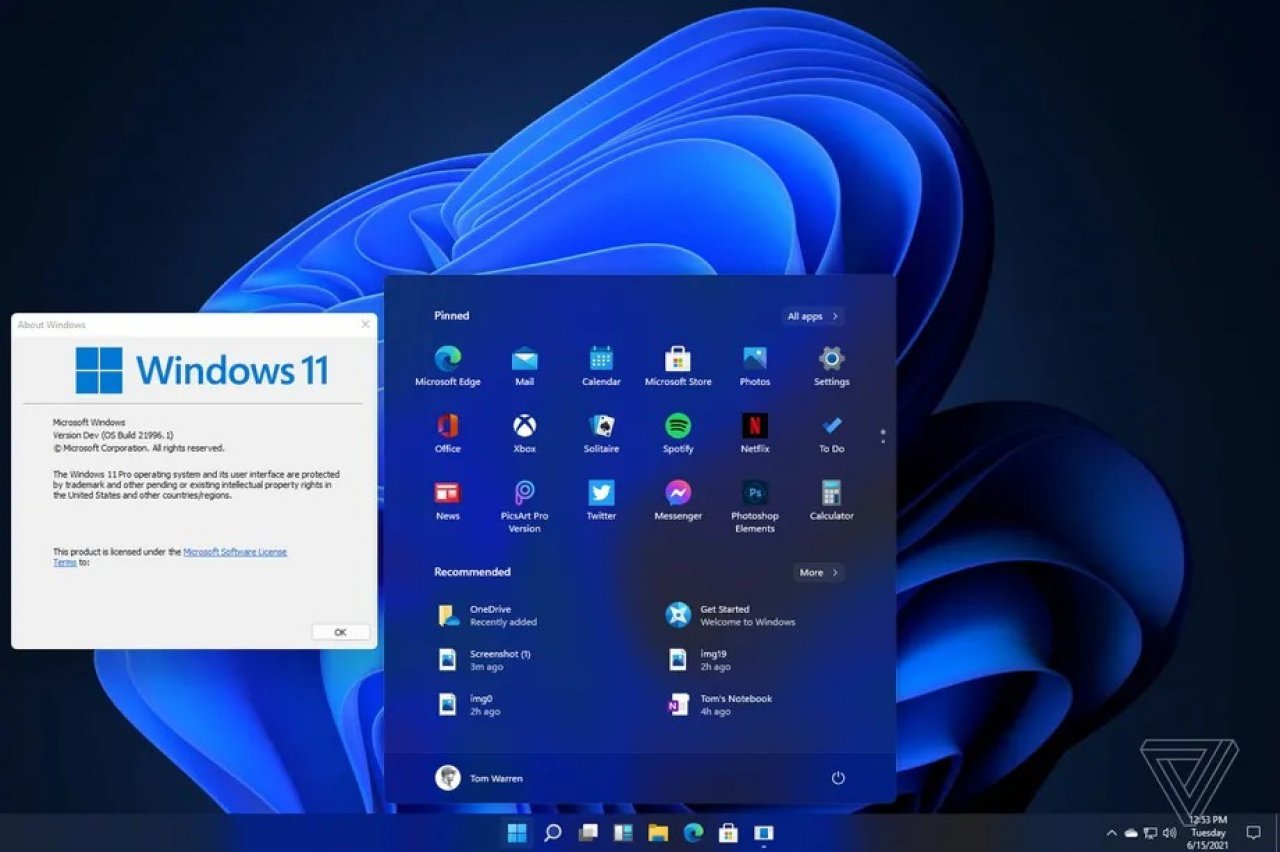
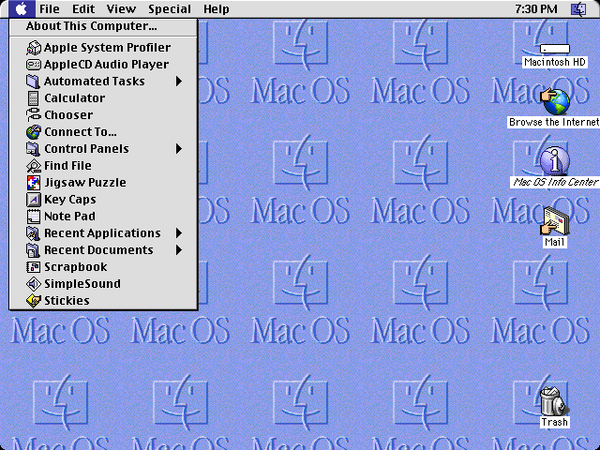
Shell variants
Left: Command Prompt, Right: Bash 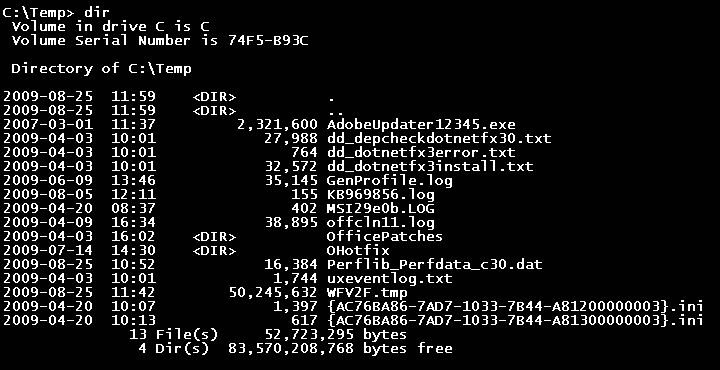
Left: C Shell, Right: more shells

Credit Read-back spider/Dave Kerr
- It is important to note that there are many different shell programs, and they differ in terms of functionality.
- On most Unix-like systems, the default shell is a program called bash, which stands for “Bourne Again Shell”.
- Other examples are the Z Shell (or zsh; default on MacOS), Windows Command Prompt (cmd.exe, the default CLI on MS Windows), Windows PowerShell, C Shell, and many more.
- When a terminal opens, it will immediately start the user’s preferred shell program. (This can be changed.)
Why bother with the shell?
Why bother with the shell?
Why bother with the shell?
Speed. Typing is fast: A skilled shell user can manipulate a system at dazzling speeds just using a keyboard. Typing commands is generally much faster than exploring through user interfaces with a mouse.
Power. Both for executing commands and for fixing problems. There are some things you just can’t do in an IDE or GUI. It also avoids memory complications associated with certain applications and/or IDEs.
Reproducibility. Scripting is reproducible, while clicking is not.
Portability. A shell can be used to interface to almost any type of computer, from a mainframe to a Raspberry Pi, in a very similar way. The shell is often the only game in town for high performance computing (interacting with servers and super computers).
Automation. Shells are programmable: Working in the shell allows you to program workflows, that is create scripts to automate time-consuming or repetitive processes.
Become a marketable data scientist. Modern programming is often polyglot. The shell provides a common interface for tooling. Modern solutions are often built to run in containers on Linux. In this environment shell knowledge has become very valuable. In short, the shell is having a renaissance in the age of data science.
The Unix philosophy
The Unix philosophy
The shell tools that we’re going to be using have their roots in the Unix family of operating systems originally developed at Bells Labs in the 1970s.
Besides paying homage, acknowledging the Unix lineage is important because these tools still embody the “Unix philosophy”:
Do One Thing And Do It Well
By pairing and chaining well-designed individual components, we can build powerful and much more complex larger systems.
You can see why the Unix philosophy is also referred to as “minimalist and modular”.
Again, this philosophy is very clearly expressed in the design and functionality of the Unix shell.
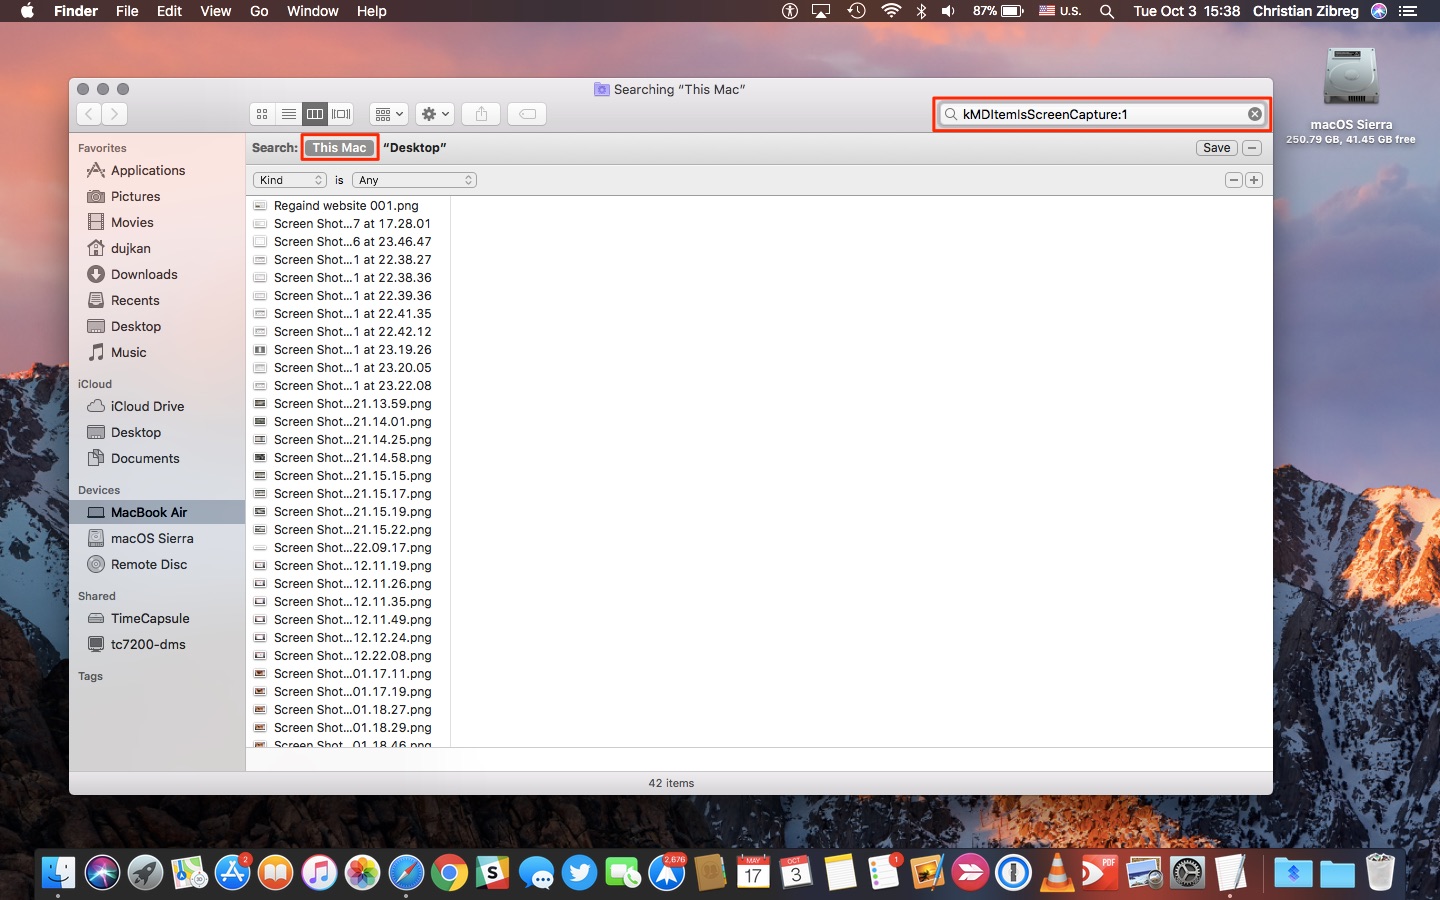
Things to use the shell for
Version control with Git
Renaming and moving files en masse
Finding things on your computer
Combining and manipulating PDFs
Installing and updating software
Scheduling tasks
Monitoring system resources
Connecting to cloud environments
Running analyses (“jobs”) on super computers
etc.
Shell basics
Shell: First look
Let’s open up our shell.
A convenient way to do this is through RStudio’s built-in Terminal.
Hitting Shift+Alt+T (or Shift+⌥+R on a Mac) will cause a “Terminal” tab to open up next to the “Console” tab.
Your system default shell is loaded. To find out what that is, type:
It’s Z bash in my case.
Shell: First look
You should see something like:
This is shell-speak for: “Who am I and where am I?”
usernamedenotes a specific user (one of potentially many on this computer).@hostnamedenotes the name of the computer or server.:~denotes the directory path (where~signifies the user’s home directory).$(or maybe%) denotes the start of the command prompt.- (For a special “superuser” called root, the dollar sign will change to a
#).
- (For a special “superuser” called root, the dollar sign will change to a
Useful keyboard shortcuts
Tabcompletion.Use the
↑(and↓) keys to scroll through previous commands.Ctrl+→(andCtrl+←) to skip whole words at a time.Ctrl+amoves the cursor to the beginning of the line.Ctrl+emoves the cursor to the end of the line.Ctrl+kdeletes everything to the right of the cursor.Ctrl+udeletes everything to the left of the cursor.Ctrl+Shift+cto copy andCtrl+Shift+vto paste (or just⌘+c/von a Mac).Ctrl+lclears your terminal.
Syntax
Syntax
All Bash commands have the same basic syntax:
Examples:
Commands
You don’t always need options or arguments.
For example:
$ ls ~/Documents/and$ ls -lhare both valid commands that will yield output.
- However, you always need a command.
Syntax
All Bash commands have the same basic syntax:
Examples:
Options (also called Flags)
Start with a dash.
Usually one letter.
Multiple options can be chained under a single dash.
An exception is with (rarer) options requiring two dashes.
l: Use a long listing format. This option shows detailed information about the files and directories.h: With-l, print sizes in human-readable format (e.g., KB, MB).u: Unique, sort will write only one of two lines that compare equal. It filters out the duplicate entries in the output.Think it’s difficult to memorize what the individual letters stand for? You’re totally right.
Syntax
All Bash commands have the same basic syntax:
Examples:
Help!
Multiple ways to get help
The
mantool can be used to look at the manual page for a topic.The
manpages are grouped into sections, we can see them withman man.The
tldrtool shows a very short description of a tool, which covers the most common use cases only.The
cht.shwebsite can be used directly from the shell to get help on tools or even ask specific questions. (Or installcheat.)For more info on how to get help, see here.
Actually, typing
man bashand reading/skimming the whole thing might be a good start to learn basic command line speak.
Getting help with man
The man command (“manual pages”) is your friend if you need help.
LS(1) General Commands Manual LS(1)
NNAAMMEE
llss – list directory contents
SSYYNNOOPPSSIISS
llss [--@@AABBCCFFGGHHIILLOOPPRRSSTTUUWWaabbccddeeffgghhiikkllmmnnooppqqrrssttuuvvwwxxyy11%%,,] [----ccoolloorr=_w_h_e_n]
[--DD _f_o_r_m_a_t] [_f_i_l_e _._._.]
DDEESSCCRRIIPPTTIIOONN
For each operand that names a _f_i_l_e of a type other than directory, llss
displays its name as well as any requested, associated information. For
each operand that names a _f_i_l_e of type directory, llss displays the names
of files contained within that directory, as well as any requested,
associated information.
If no operands are given, the contents of the current directory are
displayed. If more than one operand is given, non-directory operands are
displayed first; directory and non-directory operands are sorted
separately and in lexicographical order.
The following options are available:
--@@ Display extended attribute keys and sizes in long (--ll) output.
--AA Include directory entries whose names begin with a dot (‘_.’)
except for _. and _._.. Automatically set for the super-user unless
--II is specified.
--BB Force printing of non-printable characters (as defined by
ctype(3) and current locale settings) in file names as \_x_x_x,
where _x_x_x is the numeric value of the character in octal. This
option is not defined in IEEE Std 1003.1-2008 (“POSIX.1”).
--CC Force multi-column output; this is the default when output is to
a terminal.
--DD _f_o_r_m_a_t
When printing in the long (--ll) format, use _f_o_r_m_a_t to format the
date and time output. The argument _f_o_r_m_a_t is a string used by
strftime(3). Depending on the choice of format string, this may
result in a different number of columns in the output. This
option overrides the --TT option. This option is not defined in
IEEE Std 1003.1-2008 (“POSIX.1”).
--FF Display a slash (‘/’) immediately after each pathname that is a
directory, an asterisk (‘*’) after each that is executable, an at
sign (‘@’) after each symbolic link, an equals sign (‘=’) after
each socket, a percent sign (‘%’) after each whiteout, and a
vertical bar (‘|’) after each that is a FIFO.
--GG Enable colorized output. This option is equivalent to defining
CLICOLOR or COLORTERM in the environment and setting
----ccoolloorr=_a_u_t_o. (See below.) This functionality can be compiled
out by removing the definition of COLORLS. This option is not
defined in IEEE Std 1003.1-2008 (“POSIX.1”).
--HH Symbolic links on the command line are followed. This option is
assumed if none of the --FF, --dd, or --ll options are specified.
--II Prevent --AA from being automatically set for the super-user. This
option is not defined in IEEE Std 1003.1-2008 (“POSIX.1”).
--LL Follow all symbolic links to final target and list the file or
directory the link references rather than the link itself. This
option cancels the --PP option.
--OO Include the file flags in a long (--ll) output. This option is
incompatible with IEEE Std 1003.1-2008 (“POSIX.1”). See
chflags(1) for a list of file flags and their meanings.
--PP If argument is a symbolic link, list the link itself rather than
the object the link references. This option cancels the --HH and
--LL options.
--RR Recursively list subdirectories encountered.
--SS Sort by size (largest file first) before sorting the operands in
lexicographical order.
--TT When printing in the long (--ll) format, display complete time
information for the file, including month, day, hour, minute,
second, and year. The --DD option gives even more control over the
output format. This option is not defined in IEEE Std
1003.1-2008 (“POSIX.1”).
--UU Use time when file was created for sorting or printing. This
option is not defined in IEEE Std 1003.1-2008 (“POSIX.1”).
--WW Display whiteouts when scanning directories. This option is not
defined in IEEE Std 1003.1-2008 (“POSIX.1”).
--aa Include directory entries whose names begin with a dot (‘_.’).
--bb As --BB, but use C escape codes whenever possible. This option is
not defined in IEEE Std 1003.1-2008 (“POSIX.1”).
--cc Use time when file status was last changed for sorting or
printing.
----ccoolloorr=_w_h_e_n
Output colored escape sequences based on _w_h_e_n, which may be set
to either aallwwaayyss, aauuttoo, or nneevveerr.
aallwwaayyss will make llss always output color. If TERM is unset or set
to an invalid terminal, then llss will fall back to explicit ANSI
escape sequences without the help of termcap(5). aallwwaayyss is the
default if ----ccoolloorr is specified without an argument.
aauuttoo will make llss output escape sequences based on termcap(5),
but only if stdout is a tty and either the --GG flag is specified
or the COLORTERM environment variable is set and not empty.
nneevveerr will disable color regardless of environment variables.
nneevveerr is the default when neither ----ccoolloorr nor --GG is specified.
For compatibility with GNU coreutils, llss supports yyeess or ffoorrccee as
equivalent to aallwwaayyss, nnoo or nnoonnee as equivalent to nneevveerr, and ttttyy
or iiff--ttttyy as equivalent to aauuttoo.
--dd Directories are listed as plain files (not searched recursively).
--ee Print the Access Control List (ACL) associated with the file, if
present, in long (--ll) output.
--ff Output is not sorted. This option turns on --aa. It also negates
the effect of the --rr, --SS and --tt options. As allowed by IEEE Std
1003.1-2008 (“POSIX.1”), this option has no effect on the --dd, --ll,
--RR and --ss options.
--gg This option has no effect. It is only available for
compatibility with 4.3BSD, where it was used to display the group
name in the long (--ll) format output. This option is incompatible
with IEEE Std 1003.1-2008 (“POSIX.1”).
--hh When used with the --ll option, use unit suffixes: Byte, Kilobyte,
Megabyte, Gigabyte, Terabyte and Petabyte in order to reduce the
number of digits to four or fewer using base 2 for sizes. This
option is not defined in IEEE Std 1003.1-2008 (“POSIX.1”).
--ii For each file, print the file's file serial number (inode
number).
--kk This has the same effect as setting environment variable
BLOCKSIZE to 1024, except that it also nullifies any --hh options
to its left.
--ll (The lowercase letter “ell”.) List files in the long format, as
described in the _T_h_e _L_o_n_g _F_o_r_m_a_t subsection below.
--mm Stream output format; list files across the page, separated by
commas.
--nn Display user and group IDs numerically rather than converting to
a user or group name in a long (--ll) output. This option turns on
the --ll option.
--oo List in long format, but omit the group id.
--pp Write a slash (‘/’) after each filename if that file is a
directory.
--qq Force printing of non-graphic characters in file names as the
character ‘?’; this is the default when output is to a terminal.
--rr Reverse the order of the sort.
--ss Display the number of blocks used in the file system by each
file. Block sizes and directory totals are handled as described
in _T_h_e _L_o_n_g _F_o_r_m_a_t subsection below, except (if the long format
is not also requested) the directory totals are not output when
the output is in a single column, even if multi-column output is
requested. (--ll) format, display complete time information for
the file, including month, day, hour, minute, second, and year.
The --DD option gives even more control over the output format.
This option is not defined in IEEE Std 1003.1-2008 (“POSIX.1”).
--tt Sort by descending time modified (most recently modified first).
If two files have the same modification timestamp, sort their
names in ascending lexicographical order. The --rr option reverses
both of these sort orders.
Note that these sort orders are contradictory: the time sequence
is in descending order, the lexicographical sort is in ascending
order. This behavior is mandated by IEEE Std 1003.2 (“POSIX.2”).
This feature can cause problems listing files stored with
sequential names on FAT file systems, such as from digital
cameras, where it is possible to have more than one image with
the same timestamp. In such a case, the photos cannot be listed
in the sequence in which they were taken. To ensure the same
sort order for time and for lexicographical sorting, set the
environment variable LS_SAMESORT or use the --yy option. This
causes llss to reverse the lexicographical sort order when sorting
files with the same modification timestamp.
--uu Use time of last access, instead of time of last modification of
the file for sorting (--tt) or long printing (--ll).
--vv Force unedited printing of non-graphic characters; this is the
default when output is not to a terminal.
--ww Force raw printing of non-printable characters. This is the
default when output is not to a terminal. This option is not
defined in IEEE Std 1003.1-2001 (“POSIX.1”).
--xx The same as --CC, except that the multi-column output is produced
with entries sorted across, rather than down, the columns.
--yy When the --tt option is set, sort the alphabetical output in the
same order as the time output. This has the same effect as
setting LS_SAMESORT. See the description of the --tt option for
more details. This option is not defined in IEEE Std 1003.1-2001
(“POSIX.1”).
--%% Distinguish dataless files and directories with a '%' character
in long (--ll) output, and don't materialize dataless directories
when listing them.
--11 (The numeric digit “one”.) Force output to be one entry per line.
This is the default when output is not to a terminal.
--, (Comma) When the --ll option is set, print file sizes grouped and
separated by thousands using the non-monetary separator returned
by localeconv(3), typically a comma or period. If no locale is
set, or the locale does not have a non-monetary separator, this
option has no effect. This option is not defined in IEEE Std
1003.1-2001 (“POSIX.1”).
The --11, --CC, --xx, and --ll options all override each other; the last one
specified determines the format used.
The --cc, --uu, and --UU options all override each other; the last one
specified determines the file time used.
The --SS and --tt options override each other; the last one specified
determines the sort order used.
The --BB, --bb, --ww, and --qq options all override each other; the last one
specified determines the format used for non-printable characters.
The --HH, --LL and --PP options all override each other (either partially or
fully); they are applied in the order specified.
By default, llss lists one entry per line to standard output; the
exceptions are to terminals or when the --CC or --xx options are specified.
File information is displayed with one or more ⟨blank⟩s separating the
information associated with the --ii, --ss, and --ll options.
TThhee LLoonngg FFoorrmmaatt
If the --ll option is given, the following information is displayed for
each file: file mode, number of links, owner name, group name, number of
bytes in the file, abbreviated month, day-of-month file was last
modified, hour file last modified, minute file last modified, and the
pathname. If the file or directory has extended attributes, the
permissions field printed by the --ll option is followed by a '@'
character. Otherwise, if the file or directory has extended security
information (such as an access control list), the permissions field
printed by the --ll option is followed by a '+' character. If the --%%
option is given, a '%' character follows the permissions field for
dataless files and directories, possibly replacing the '@' or '+'
character.
If the modification time of the file is more than 6 months in the past or
future, and the --DD or --TT are not specified, then the year of the last
modification is displayed in place of the hour and minute fields.
If the owner or group names are not a known user or group name, or the --nn
option is given, the numeric ID's are displayed.
If the file is a character special or block special file, the device
number for the file is displayed in the size field. If the file is a
symbolic link the pathname of the linked-to file is preceded by “->”.
The listing of a directory's contents is preceded by a labeled total
number of blocks used in the file system by the files which are listed as
the directory's contents (which may or may not include _. and _._. and other
files which start with a dot, depending on other options).
The default block size is 512 bytes. The block size may be set with
option --kk or environment variable BLOCKSIZE. Numbers of blocks in the
output will have been rounded up so the numbers of bytes is at least as
many as used by the corresponding file system blocks (which might have a
different size).
The file mode printed under the --ll option consists of the entry type and
the permissions. The entry type character describes the type of file, as
follows:
-- Regular file.
bb Block special file.
cc Character special file.
dd Directory.
ll Symbolic link.
pp FIFO.
ss Socket.
ww Whiteout.
The next three fields are three characters each: owner permissions, group
permissions, and other permissions. Each field has three character
positions:
1. If rr, the file is readable; if --, it is not readable.
2. If ww, the file is writable; if --, it is not writable.
3. The first of the following that applies:
SS If in the owner permissions, the file is not
executable and set-user-ID mode is set. If in the
group permissions, the file is not executable and
set-group-ID mode is set.
ss If in the owner permissions, the file is
executable and set-user-ID mode is set. If in the
group permissions, the file is executable and
setgroup-ID mode is set.
xx The file is executable or the directory is
searchable.
-- The file is neither readable, writable,
executable, nor set-user-ID nor set-group-ID mode,
nor sticky. (See below.)
These next two apply only to the third character in the last
group (other permissions).
TT The sticky bit is set (mode 1000), but not execute
or search permission. (See chmod(1) or
sticky(7).)
tt The sticky bit is set (mode 1000), and is
searchable or executable. (See chmod(1) or
sticky(7).)
The next field contains a plus (‘+’) character if the file has an ACL, or
a space (‘ ’) if it does not. The llss utility does not show the actual
ACL unless the --ee option is used in conjunction with the --ll option.
EENNVVIIRROONNMMEENNTT
The following environment variables affect the execution of llss:
BLOCKSIZE If this is set, its value, rounded up to 512 or down
to a multiple of 512, will be used as the block size
in bytes by the --ll and --ss options. See _T_h_e _L_o_n_g
_F_o_r_m_a_t subsection for more information.
CLICOLOR Use ANSI color sequences to distinguish file types.
See LSCOLORS below. In addition to the file types
mentioned in the --FF option some extra attributes
(setuid bit set, etc.) are also displayed. The
colorization is dependent on a terminal type with the
proper termcap(5) capabilities. The default “cons25”
console has the proper capabilities, but to display
the colors in an xterm(1), for example, the TERM
variable must be set to “xterm-color”. Other
terminal types may require similar adjustments.
Colorization is silently disabled if the output is
not directed to a terminal unless the CLICOLOR_FORCE
variable is defined or ----ccoolloorr is set to “always”.
CLICOLOR_FORCE Color sequences are normally disabled if the output
is not directed to a terminal. This can be
overridden by setting this variable. The TERM
variable still needs to reference a color capable
terminal however otherwise it is not possible to
determine which color sequences to use.
COLORTERM See description for CLICOLOR above.
COLUMNS If this variable contains a string representing a
decimal integer, it is used as the column position
width for displaying multiple-text-column output.
The llss utility calculates how many pathname text
columns to display based on the width provided. (See
--CC and --xx.)
LANG The locale to use when determining the order of day
and month in the long --ll format output. See
environ(7) for more information.
LSCOLORS The value of this variable describes what color to
use for which attribute when colors are enabled with
CLICOLOR or COLORTERM. This string is a
concatenation of pairs of the format _f_b, where _f is
the foreground color and _b is the background color.
The color designators are as follows:
aa black
bb red
cc green
dd brown
ee blue
ff magenta
gg cyan
hh light grey
AA bold black, usually shows up as dark grey
BB bold red
CC bold green
DD bold brown, usually shows up as yellow
EE bold blue
FF bold magenta
GG bold cyan
HH bold light grey; looks like bright white
xx default foreground or background
Note that the above are standard ANSI colors. The
actual display may differ depending on the color
capabilities of the terminal in use.
The order of the attributes are as follows:
1. directory
2. symbolic link
3. socket
4. pipe
5. executable
6. block special
7. character special
8. executable with setuid bit set
9. executable with setgid bit set
10. directory writable to others, with sticky
bit
11. directory writable to others, without
sticky bit
The default is "exfxcxdxbxegedabagacad", i.e., blue
foreground and default background for regular
directories, black foreground and red background for
setuid executables, etc.
LS_COLWIDTHS If this variable is set, it is considered to be a
colon-delimited list of minimum column widths.
Unreasonable and insufficient widths are ignored
(thus zero signifies a dynamically sized column).
Not all columns have changeable widths. The fields
are, in order: inode, block count, number of links,
user name, group name, flags, file size, file name.
LS_SAMESORT If this variable is set, the --tt option sorts the
names of files with the same modification timestamp
in the same sense as the time sort. See the
description of the --tt option for more details.
TERM The CLICOLOR and COLORTERM functionality depends on a
terminal type with color capabilities.
TZ The timezone to use when displaying dates. See
environ(7) for more information.
EEXXIITT SSTTAATTUUSS
The llss utility exits 0 on success, and >0 if an error occurs.
EEXXAAMMPPLLEESS
List the contents of the current working directory in long format:
$ ls -l
In addition to listing the contents of the current working directory in
long format, show inode numbers, file flags (see chflags(1)), and suffix
each filename with a symbol representing its file type:
$ ls -lioF
List the files in _/_v_a_r_/_l_o_g, sorting the output such that the most
recently modified entries are printed first:
$ ls -lt /var/log
CCOOMMPPAATTIIBBIILLIITTYY
The group field is now automatically included in the long listing for
files in order to be compatible with the IEEE Std 1003.2 (“POSIX.2”)
specification.
LLEEGGAACCYY DDEESSCCRRIIPPTTIIOONN
In legacy mode, the --ff option does not turn on the --aa option and the --gg,
--nn, and --oo options do not turn on the --ll option.
Also, the --oo option causes the file flags to be included in a long (-l)
output; there is no --OO option.
When --HH is specified (and not overridden by --LL or --PP) and a file argument
is a symlink that resolves to a non-directory file, the output will
reflect the nature of the link, rather than that of the file. In legacy
operation, the output will describe the file.
For more information about legacy mode, see compat(5).
SSEEEE AALLSSOO
chflags(1), chmod(1), sort(1), xterm(1), localeconv(3), strftime(3),
strmode(3), compat(5), termcap(5), sticky(7), symlink(7)
SSTTAANNDDAARRDDSS
With the exception of options --gg, --nn and --oo, the llss utility conforms to
IEEE Std 1003.1-2001 (“POSIX.1”) and IEEE Std 1003.1-2008 (“POSIX.1”).
The options --BB, --DD, --GG, --II, --TT, --UU, --WW, --ZZ, --bb, --hh, --ww, --yy and --, are
non-standard extensions.
The ACL support is compatible with IEEE Std 1003.2c (“POSIX.2c”) Draft 17
(withdrawn).
HHIISSTTOORRYY
An llss command appeared in Version 1 AT&T UNIX.
BBUUGGSS
To maintain backward compatibility, the relationships between the many
options are quite complex.
The exception mentioned in the --ss option description might be a feature
that was based on the fact that single-column output usually goes to
something other than a terminal. It is debatable whether this is a
design bug.
IEEE Std 1003.2 (“POSIX.2”) mandates opposite sort orders for files with
the same timestamp when sorting with the --tt option.
macOS 14.2 August 31, 2020 macOS 14.2Getting help with man
Manual pages are shown in the shell pager. Here are the essentials to navigate through contents presented in the pager:
d- Scroll down half a pageu- Scroll up half a pagej/k- Scroll down or up a line. You can also use the arrow keys for thisq- Quit/pattern- Search for text provided as “pattern”n- When searching, find the next occurrenceN- When searching, find the previous occurrenceThese and other
mantricks are detailed in the help pages (hit “h” when you’re in the pager for an overview).

Help practice!
In your Terminal, access the
manand explore the document. I want you to share with a colleague your first impression and five commands you found interesting.Please present your own (first impression + five commands) and colleague (first impression and five commands) views in the lecture quiz!
Help: cheat, tldr, cheat.sh
There are various other utilities which provide more readable summaries/cheatsheets of various commands. Those include
The first two need to be installed first. cheat.sh sheets are accessible via:
# List files one per line:
ls -1

# List all files, including hidden files:
ls -a

# List all files, with trailing `/` added to directory names:
ls -F

# Long format list with size displayed using human readable units (KB, MB, GB):
ls -lh
Navigating your file system
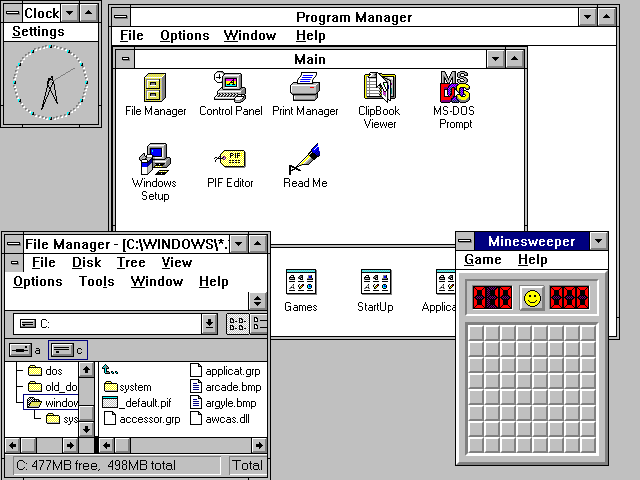
Navigating your file system
We’re all so used to a graphical user interface that switching to the shell can take some time to get used to.
Modern operating systems increasingly abstract away from underlying file systems (think about iOS, Android).
For data science operations it is key that you’re able to efficiently navigate your system to get information on files and folders.
Some questions that will pop up:
- What is my home directory?
- In which directory am I currently operating?
- Where is my stuff?
- Where do I want to put my stuff?
- How do I navigate from here to there?

Navigation
Key navigation commands are:
pwdto print (the current) working directory.cdto change directory.
Navigation
You can use absolute paths, but it’s better to use relative paths and invoke special symbols for a user’s home folder (~), current directory (.), and parent directory (..) as needed.
cd slides-topic-02-02-examples ## Move into the "slides-topic-02-02-examples" sub-directory of this lecture directory.
cd ../.. ## Now go back up two directories.
pwdNavigation
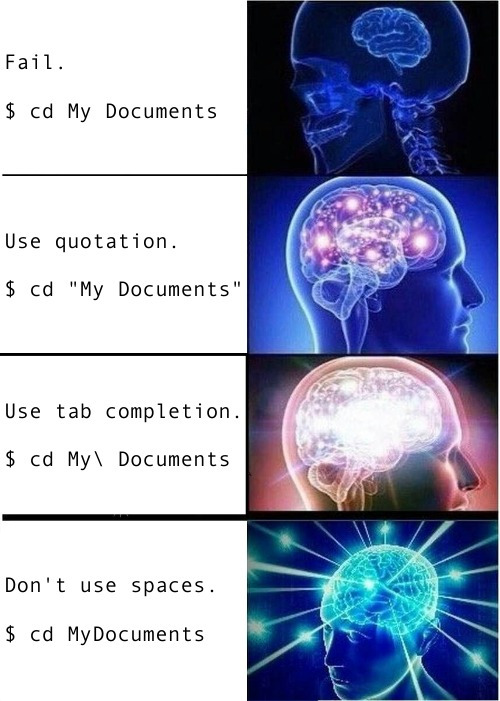
Beware of directory names that contain spaces. Say you have a directory called “My Documents”. (I’m looking at you, Windows.)
Why won’t
$ cd My Documentswork?Bash syntax is super pedantic about spaces and ordering. Here it thinks that “My” and “Documents” are separate arguments.
How to deal with it:
- Use quotation marks:
$ cd "My Documents". - Use Tab completion to automatically “escape” the space:
$ cd My\ Documents. - Don’t use spaces in file and folder names. Just don’t.
- I’ve developed the habit to name files and folders
- always lowercase and
- using dashes or snake_case, as in
assignment-05orassignment_05. These are useful conventions!
- Use quotation marks:
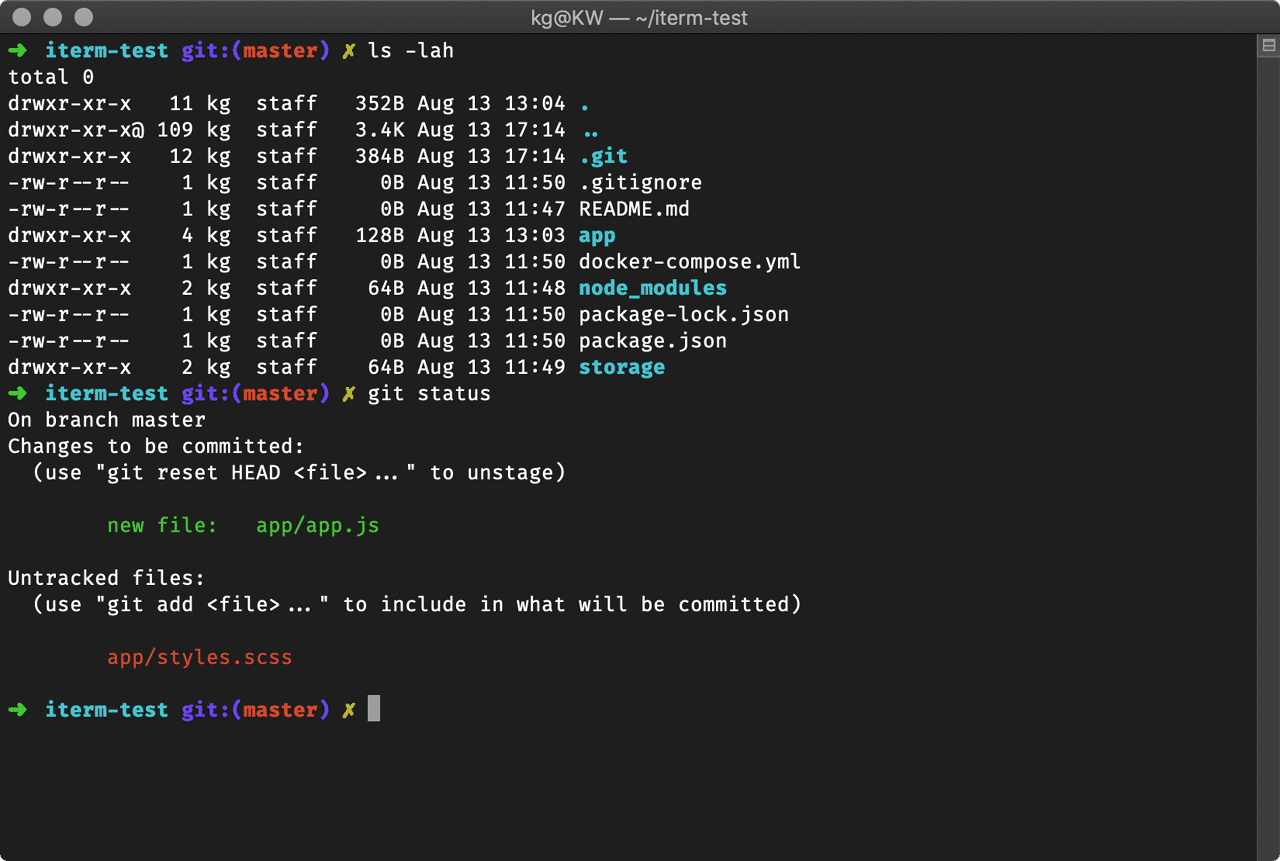
Listing files and their properties
We’re about to go into more depth about the ls (list) command. It shows the contents of the current (or given) directory:
_slides-topic-02-02.html     slides-topic-01.qmd
_slides-topic-02-02_files    slides-topic-02-01.qmd
_slides-topic-02.html        slides-topic-02-02-aux.ipynb
_slides-topic-02_aux.qmd     slides-topic-02-02-aux.qmd
_slides-topic-02_files       slides-topic-02-02-examples
custom.css                   slides-topic-02-02.qmd
custom.scss                  slides-topic-02-03.qmd
figs                         survive.txt
libs
Now we list the contents of the slides-topic-02-02-examples/ sub-directory with the -lh option (“long format”, “human readable file size unit suffixes”; again, check out man ls for the details):
total 15304
-rw-r--r--@ 1 dcorde3  206888963   4.8M Feb  3 18:14 bbc_text_cls.csv
-rw-r--r--@ 1 dcorde3  206888963    23K Feb  3 15:22 diabetes.csv
-rw-r--r--@ 1 dcorde3  206888963   2.6M Feb  4 13:35 naive_bayes.ipynb
Listing files and their properties
Now we list the contents of the slides-topic-02-02-examples/ sub-directory with the -lh option (“long format”, “human readable file size unit suffixes”; again, check out man ls for the details):
total 15304
-rw-r--r--@ 1 dcorde3  206888963   4.8M Feb  3 18:14 bbc_text_cls.csv
-rw-r--r--@ 1 dcorde3  206888963    23K Feb  3 15:22 diabetes.csv
-rw-r--r--@ 1 dcorde3  206888963   2.6M Feb  4 13:35 naive_bayes.ipynb
What does this all mean? Let’s focus on the top line.
The first column denotes the object type:
d(directory or folder),l(link), or-(file)
Next, we see the permissions associated with the object’s three possible user types: 1) owner, 2) the owner’s group, and 3) all other users.
- Permissions reflect
r(read),w(write), orx(execute) access. -denotes missing permissions for a class of operations.
- Permissions reflect
The number of hard links to the object.
We also see the identity of the object’s owner and their group.
Finally, we see some descriptive elements about the object:
- Size, date and time of creation, and the object name.
Summary
- The
pwd(print working directory) command shows the current working directory. - The
ls(list) command shows the contents of the current directory or a given directory. - The
ls -lcommand shows the contents of the current directory as list. - The
cd(change directory) changes the current working directory. - You can run
cdat any time to quickly go to your home directory. - You can use the
cd -command to go back to the last location. - Absolute paths are paths which specify the exact location of a file or folder.
- Relative paths are paths which are relative to the current directory.
- The
.special folder means ‘this folder’. - The
..special folder means ‘the parent folder’. - The
~special folder is the ‘home directory’. - The
$PWDenvironment variable holds the current working directory. - The
$HOMEenvironment variable holds the user’s home directory. - The
treecommand can show the files and folders in a given directory. (Install first on a Mac.) - The
filecommand can be used to ask the shell what it thinks a file is.
Managing your files
Managing your files
The obvious next step after navigating the file system is managing files.
There’s a lot you can do with files, including downloading, unzipping, copying, moving, renaming and deleting.
Again, doing this in a GUI is intuitive but usually scales badly.
We’ll learn how to do these operations at scale using the shell.
Be careful when handling files in the shell though! Don’t expect friendly reminders such as “Do you really want to delete this folder of pictures from your anniversary?”

Create: touch and mkdir
One of the most common shell tasks is object creation (files, directories, etc.).
We use mkdir to create directories. E.g., to create a new “testing” directory we do:
We use touch to create (empty) files. If the file(s) already exist, touch changes a file’s “Access”, “Modify” and “Change” timestamps to the current time and date. To add some files to our new directory, we do:
Remove: rm and rmdir
Let’s delete the objects that we just created. Start with one of the .txt files, by using rm. - We could delete all the files at the same time, but you’ll see why I want to keep some.
Uh oh… It won’t let us delete the directory while it still has files inside of it. The solution is to use the rm command again with the “recursive” (-r or -R) and “force” (-f) options. - Excluding the -f option is safer, but will trigger a confirmation prompt for every file, which I’d rather avoid here.
Copy: cp
The syntax for copying is $ cp object path/copyname.
If you don’t provide a new name for the copied object, it will just take the old name.
However, if there is already an object with the same name in the target destination, then you’ll have to use
-fto force an overwrite.
Move (and rename): mv
The syntax for moving is $ mv object path/newobjectname
 ## Move the abc.txt file and show that it worked
mv slides-topic-02-02-examples/ABC/abc.txt examples
ls slides-topic-02-02-examples/ABC ## empty
## Move it back again
mv slides-topic-02-02-examples/abc.txt slides-topic-02-02-examples/ABC
ls slides-topic-02-02-examples/ABC ## not emptyNote that “moving” an object within the same directory, but with specifying newobjectname, is effectively the same as renaming it.
 ## Rename reps-copy to reps2 by "moving" it with a new name
mv slides-topic-02-02-examples/copies/reps-copy.txt slides-topic-02-02-examples/copies/reps2.txt
ls slides-topic-02-02-examples/copiesRename en masse : zmv
A more convenient way to do renaming in zsh is with zmv. It has to be installed and autoloaded first:
The syntax is zmv <options> <old-files-pattern> <new-files-pattern>
For example, say we want to change the file type (i.e. extension) of a set of files in the slides-topic-02-02-examples/meals directory, we do:
A very useful flag is -n which does not execute the command but prints the command that would be executed. Use this if you are unsure about your patterns. The -W flag ensures that the wildcard * is recycled in the second pattern.
Rename en masse : zmv
zmv really shines in conjunction with regular expressions and wildcards (more on the next slide). This works especially well for dealing with a whole list of files or folders.
As another example, let’s change all of the file names in the slides-topic-02-02-examples/meals directory.
Notice that the patterns are now bit more complicated. The first is surrounded by single quotes, (**/) which defines a group that we can refer to later. It allows us to search in both the given directory and sub-directories (which we don’t have in this case). The second, (*) is also grouped. Both are referred to in the replacement pattern with $1 and $2.
Want to learn more about zmv? Check out this.
Wildcards
Wildcards are special characters that can be used as a replacement for other characters. The two most important ones are:
Replace any number of characters with
*.- Convenient when you want to copy, move, or delete a whole class of files.
cp slides-topic-02-02-examples/*.sh slides-topic-02-02-examples/copies ## Copy any file with an .sh extension to "copies"
rm slides-topic-02-02-examples/copies/* ## Delete everything in the "copies" directoryReplace a single character with
?- Convenient when you want to discriminate between similarly named files.
Find
The last command to mention is find.
This can be used to locate files and directories based on a variety of criteria; from pattern matching to object properties.
find examples -iname "monday.csv" ## will automatically do recursive, -iname makes search case-insensitiveSummary
- The
rm(remove) command can delete a file (they are gone forever, no recycle bin!). - The
rmcommand won’t delete a folder which has files in it, unless you tell it to by adding the-r(recursive) flag. - The
cp(copy) command can copy a file. - The
cpcan also be given wildcards like*to copy many files. - The
mv(move) command can move or rename a file. - The
zmvcommand enables convenient renaming. - The
mkdircommand can create a folder - it can even create a whole tree of folders if you pass the-p(create parent directories) flag. - The
findcommand lets you find files based on specified criteria. - The
catcommand (concatenated) can be used to write the contents of a file to the screen. - We can pass multiple files to commands like
catif we use wildcards, such asquotes/*. - The
wget(web get) command can download a file from the web. (Install first on a Mac.) - The
zip/unzipcommands can zip/unzip a file/folder for us.
For a more detailed overview, click here.
Working with text files
Working with text files
Data scientists spend a lot of time working with text, including scripts, Markdown documents, and delimited text files like CSVs.
You will have the opportunity to learn more on the statistical analysis of text using NLP technique over the course of your studies.
While
PythonandRare strong environments for text wrangling and analysis, it still makes sense to spend a few slides showing off some Bash shell capabilities for working with text files.We’ll only scratch the surface, but hopefully you’ll get an idea of how powerful the shell is in the text domain.

Counting text: wc
You can use the wc command to count:
- The lines of text
- The number of words
- The number of characters
Let’s demonstrate with a text file containing all of Shakespeare’s Sonnets.1
The character count is actually higher than we’d get if we count by hand, because wc counts the invisible newline character “”.
Reading text
Read everything: cat
The simplest way to read in text is with the cat (“concatenate”) command. Note that cat will read in all of the text. You can scroll back up in your shell window, but this can still be a pain.
Again, let’s demonstrate using Shakespeare’s Sonnets. (This will overflow the slide.)
We also use the -n flag to show line numbers:
Scroll: more and less
The more and less commands provide extra functionality over cat. For example, they allow you to move through long text one page at a time. (While they look similar, less is more than more, more or less…)
- You can move forward and back using the
fandbkeys, and quit by hittingq.
Preview: head and tail
The head and tail commands let you limit yourself to a preview of the text, down to a specified number of rows. (The default is 10 rows if you don’t specify a number with the -n flag.)
head -n 3 slides-topic-02-02-examples/sonnets.txt ## First 3 rows
# head slides-topic-02-02-examples/sonnets.txt ## First 10 rows (default)Preview: head and tail
tail works very similarly to head, but starting from the bottom. For example, we can see the very last row of a file as follows:
Find patterns: grep
To find patterns in text, we can use regular expression-type matching with grep.
For example, say we want to find the famous opening line to Shakespeare’s Sonnet 18.
(We’re going to include the -n (“number”) flag to get the line that it occurs on.)
grep: slides-topic-02-02-examples/sonnets.txt: No such file or directoryFind patterns: grep
Note that grep can be used to identify patterns in a group of files (e.g. within a directory) too.
- This is particularly useful if you are trying to identify a file that contains, say, a function name.
Here’s a simple example: Which days will I eat pasta this week?
- I’m using the
r(recursive) andl(just list the files; don’t print the output) flags.
Manipulate text: sed
There are two main commands for manipulating text in the shell, namely sed and awk. Both of these are very powerful and flexible. We’ll briefly look into sed for now. (Mac users, note that the MacOS sed works a bit differently; see here.)
sed is the stream editor command. It takes input from a stream - which in many cases will simply be a file. It then performs operations on the text as it is read, and returns the output.
Example 1. Replace one text pattern with another.
Let’s look at the expression s/Jack/Bill/g in detail:
- The
sindicates that we are going to run the substitute function, which is used to replace text. - The
/indicates the start of the pattern we are searching for -Billin this case. - The second
/indicates the start of the replacement we will make when the pattern is found. - The final
/indicates the end of the replacement - we can also optionally put flags after this slash. Here,gensures global replacement (not just replacement of the first match).
Summary
headwill show the first ten lines of a file.head -n 30will show the first thirty lines of a file, using the -n flag to specify the number of lines.tailwill show the final ten lines of a file.tail -n 3uses the -n flag to specify three lines only.tr 'a' 'b'is the translate characters command, which turns one set of characters into another.cutcan be used to extract parts of a line of text.cut -d',' -f 3shows how the-dor delimiter flag is used to specify the delimiter to cut on and how the-for field flag specifies which of the fields the text has been cut into is printed.cut -c 2-4uses the-cor characters flag to specify that we are extracting a subset of characters in the line, in this case characters two to four.revreverses text - by reversing, cutting and then re-reversing you can quickly extract text from the end of a line.sortsorts the incoming text alphabetically. The-rflag forsortreverses the sort order.- The
uniqcommand removes duplicate lines - but only when they are next to each other, so you’ll often use it in combination withsort. - Your pager, for example the less program can be useful when inspecting the output of your text transformation commands.
For a more detailed overview, click here.
Also, make sure to master regular expressions!

Redirects, pipes, and loops
Redirects, pipes, and loops
- You have learned about pipes (
%>%or|>) in R already. - Understanding the concept of pipelines in the shell, as well as how input and output work for command line programs is critical to be able to use the shell effectively.
- Think again of the Unix philosophy of “doing one thing, but doing it well” and combining multiple of these modules.
- Also, often you’ll want to dump output in a file as part of your workflow.
- Let’s learn how all this works.

Redirect: >
You can send output from the shell to a file using the redirect operator >.
For example, let’s print a message to the shell using the echo command.
At first, I was afraid, I was petrifiedRedirect: >
If you want to append text to an existing file, then you should use >>.
- Using
>will try to overwrite the existing file contents.
Pipes: |
The pipe operator | is one of the coolest features in Bash.
- It allows us to chain (i.e. “pipe”) together a sequence of simple operations and thereby implement a more complex operation.
Here’s a simple example:
This command sequence:
- It reads the file
sonnets.txt, numbering each line of the text. - Any errors that might occur during this process are ignored (not printed to the terminal).
- It then takes only the first 100 lines of the numbered text.
- From those 100 lines, it then takes only the last 10 lines.
- The final output displayed in the terminal will be lines 91 to 100 of the
sonnets.txtfile, along with their corresponding line numbers.
- It reads the file
cat -n slides-topic-02-02-examples/sonnets.txtcatis used to concatenate and display files.- The
-noption ofcatnumbers all output lines starting with line 1. slides-topic-02-02-examples/sonnets.txtis the file path to the text file being read. This file presumably contains sonnets or other text.
2>/dev/null2>is used to redirect the standard error (stderr) output stream./dev/nullis a special file that discards all data written to it.- This redirection sends all error messages from
cat(like file not found, no read permission, etc.) to/dev/null, effectively silencing any errors thatcatmight produce.
| head -n100- The pipe
|passes the output of the previous command (cat -n) to the next command as input. headis used to output the first part of files.- The
-n100option tellsheadto print the first 100 lines of its input.
- The pipe
| tail -n10- Another pipe
|passes the output ofhead -n100to the next command as input. tailoutputs the last part of files.- The
-n10option tellstailto print the last 10 lines of its input.
- Another pipe
Iteration with for loops
Sometimes you want to loop an operation over certain parameters. for loops in Bash/Z shell work similarly to other programming languages that you are probably familiar with.
The basic syntax is:
Example 1: Print a sequence of numbers
To help make things concrete, here’s a simple for loop in action.
1
2
3
4
5Example 2: Combine CSVs
Here’s a more realistic for loop use-case: Combining (i.e. concatenating) multiple CSVs.
Say we want to combine all the “daily” files in the /meals directory into a single CSV, which I’ll call mealplan.csv. Here’s one attempt that incorporates various bash commands and tricks that we’ve learned so far. The basic idea is:
Create a new (empty) CSV
Then, loop over the relevant input files, appending their contents to our new CSV
## create an empty CSV
touch slides-topic-02-02-examples/meals/mealplan.csv
## loop over the input files and append their contents to our new CSV
for i in $(ls slides-topic-02-02-examples/meals/*day.csv)
  do
   cat $i >> slides-topic-02-02-examples/meals/mealplan.csv
doneExample 2: Combine CSVs
Hmmm. Sort of, but we need to get rid of the repeating header.
Can you think of a way? (Hint: tail and head…)
Example 2: Combine CSVs
Let’s try again. First delete the old file so we can start afresh.
Here’s our adapted gameplan:
First, create the new file by grabbing the header (i.e. top line) from any of the input files and redirecting it. No need for
touchthis time.Next, loop over all the input files as before, but this time only append everything after the top line.
## create a new CSV by redirecting the top line of any file
head -1 slides-topic-02-02-examples/meals/monday.csv > slides-topic-02-02-examples/meals/mealplan.csv
## loop over the input files, appending everything after the top line
for i in $(ls slides-topic-02-02-examples/meals/*day.csv)
 do
   tail -n +2 $i >> slides-topic-02-02-examples/meals/mealplan.csv
doneExample 2: Combine CSVs
It worked!
We still have to sort the correct week order, but that’s an easy job in R or Python.
The explicit benefit of doing the concatenating in the shell is that it can be much more efficient, since all the files don’t simultaneously have to be held in memory (i.e RAM).
This doesn’t matter here, but can make a dramatic difference once we start working with lots of files (or even a few really big ones).
Scripting
Scripting
Writing code interactively in the shell makes a lot of sense when you are exploring data, file structures, etc.
However, it’s also possible (and often desirable) to write reproducible shell scripts that combine a sequence of commands.
These scripts are demarcated by their .sh file extension.
Let’s look at the contents of a short shell script, hello.sh, that is included in the examples folder:
What does this script do?

Hello World!
#!/bin/shis a shebang, indicating which program to run the command with (here: any Bash-compatible shell). However, it is typically ignored (note that it begins with the hash comment character.)echo "\nHello World!\n"is the actual command that we want to run.
Next steps
Things we didn’t cover here
I hope that I’ve given you a sense of how the shell works and how powerful it is. My main goal has been to “demystify” the shell, so that you aren’t intimidated when we use shell commands later on.
We didn’t cover many things:
Additional material
If you want to dig deeper, check out
The Unix Shell (Software Carpentery)
The Unix Workbench (Sean Kross)
Data Science at the Command Line (Jeroen Janssens)
Effective Shell (Dave Kerr)
Efficient Way To Process Large Text/Log Files Using Awk With Python
Using AWK and R to parse 25tb (Nick Strayer)
Thank you!
Data Science Computing